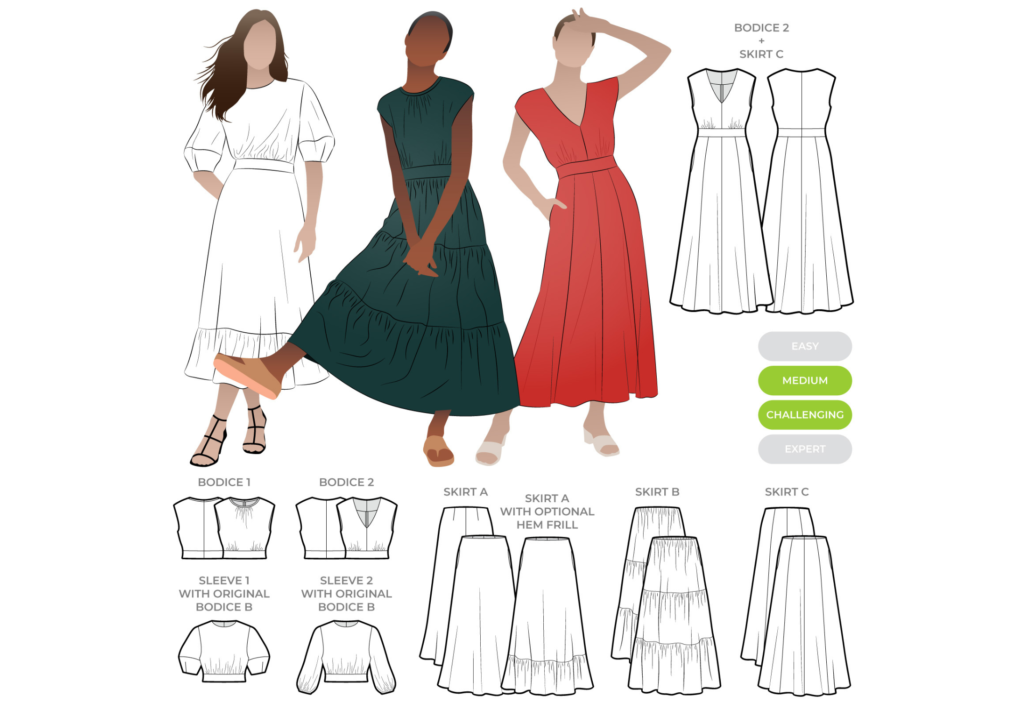
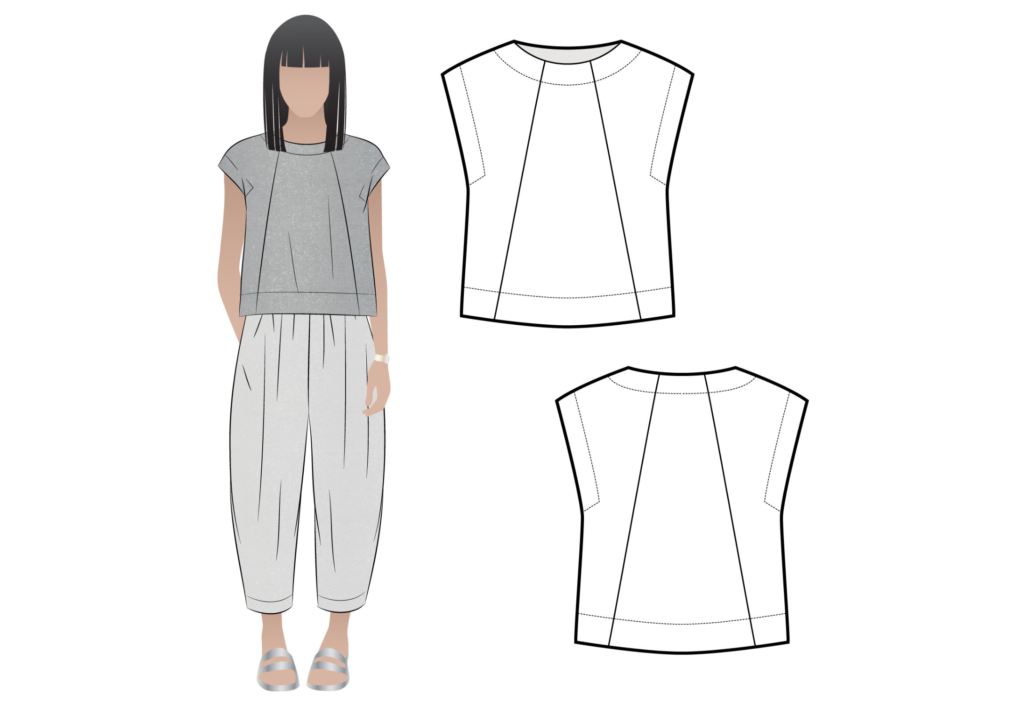
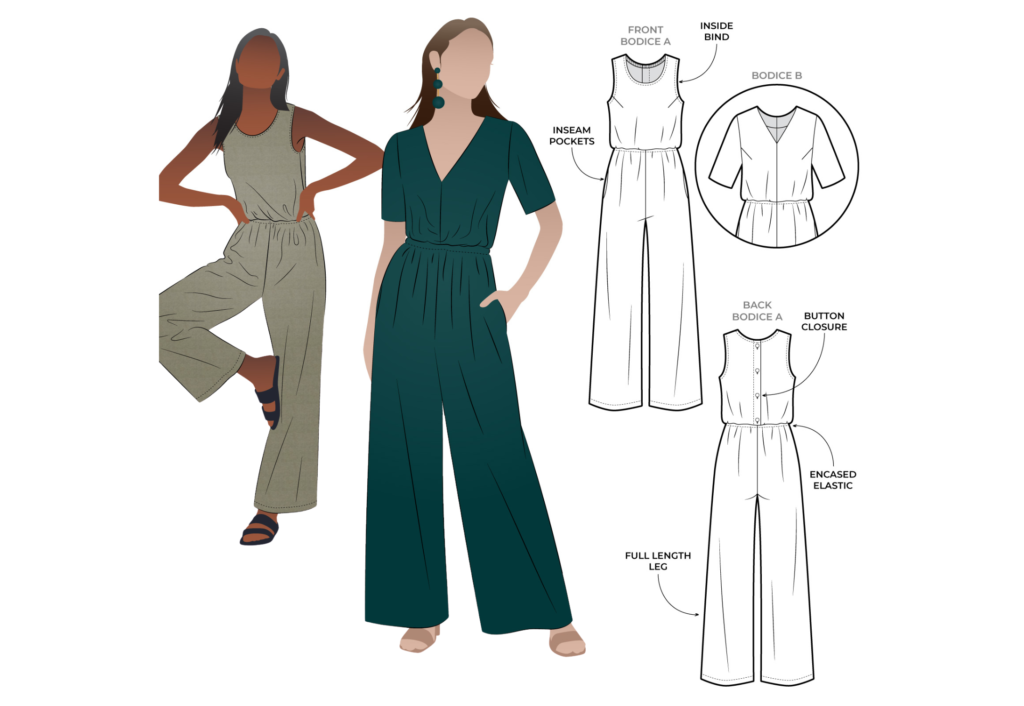
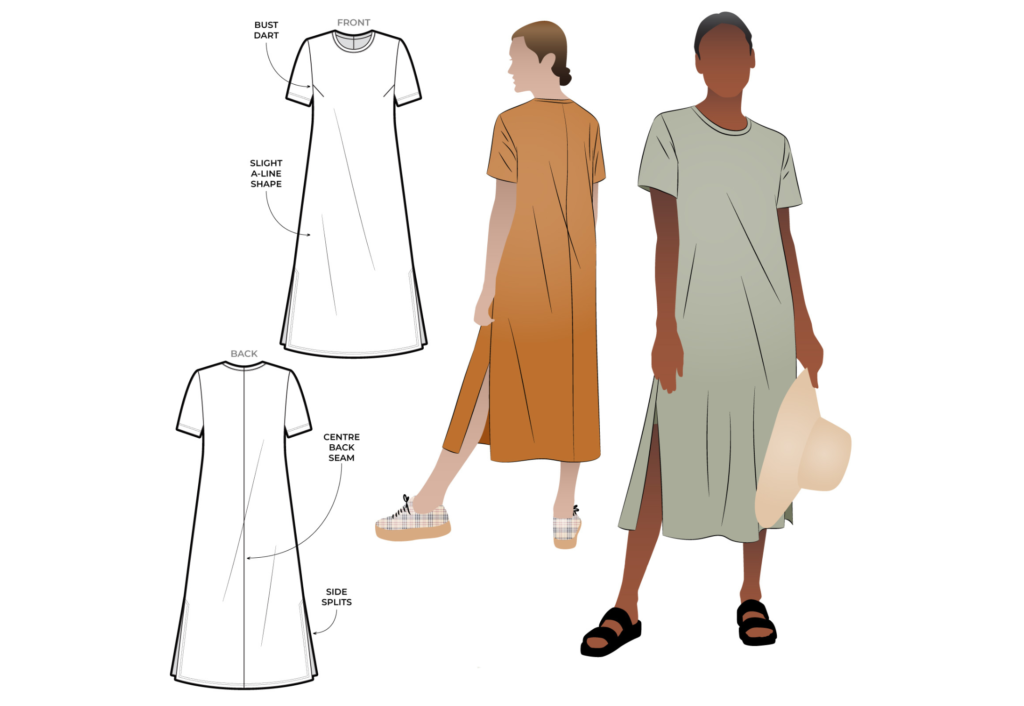
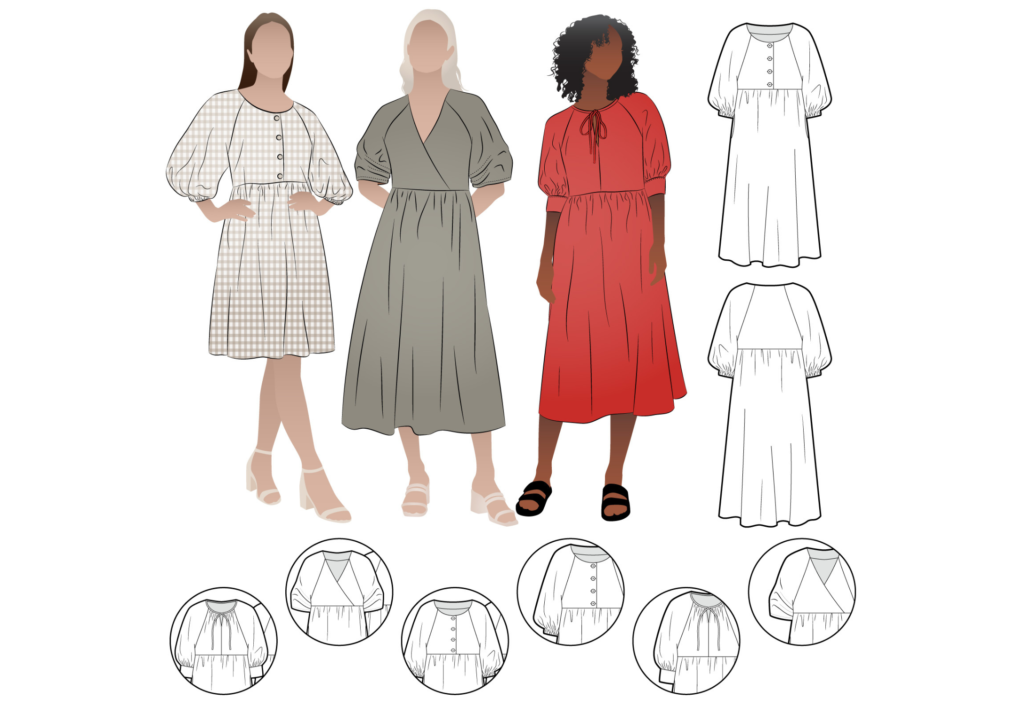
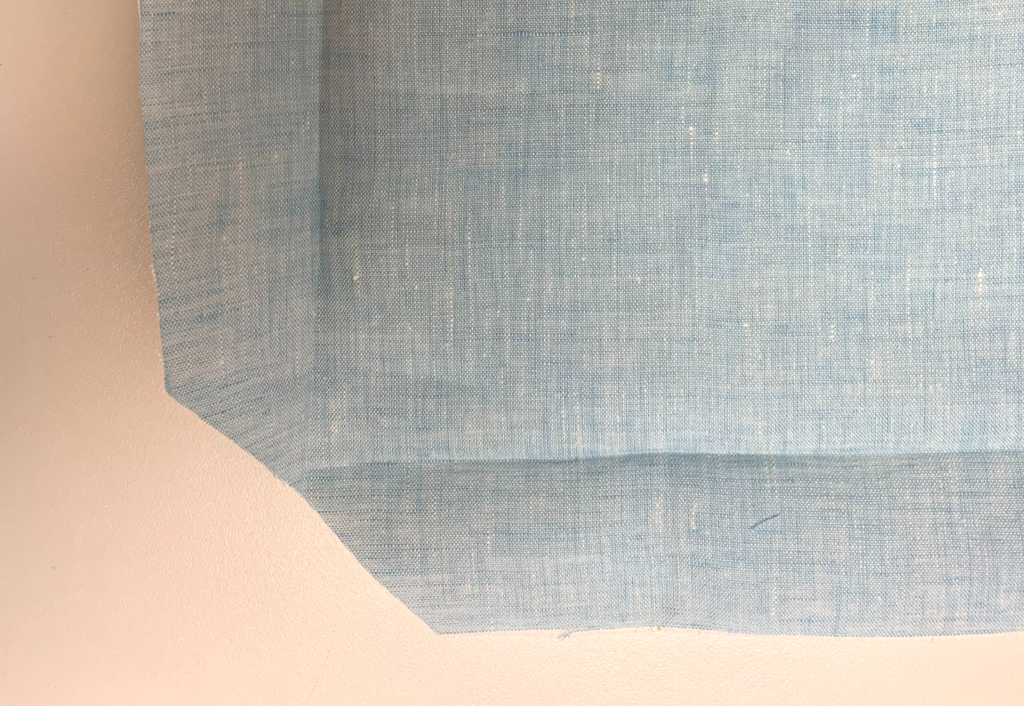
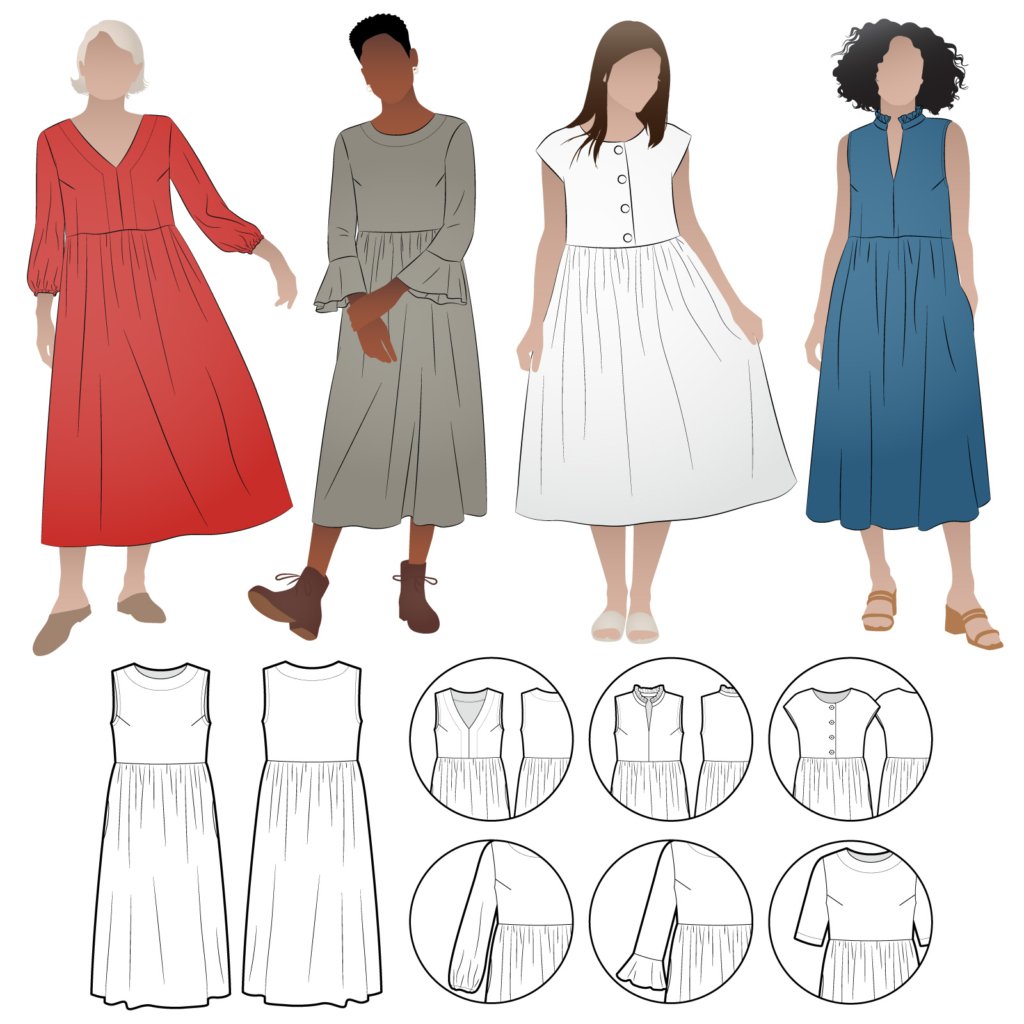
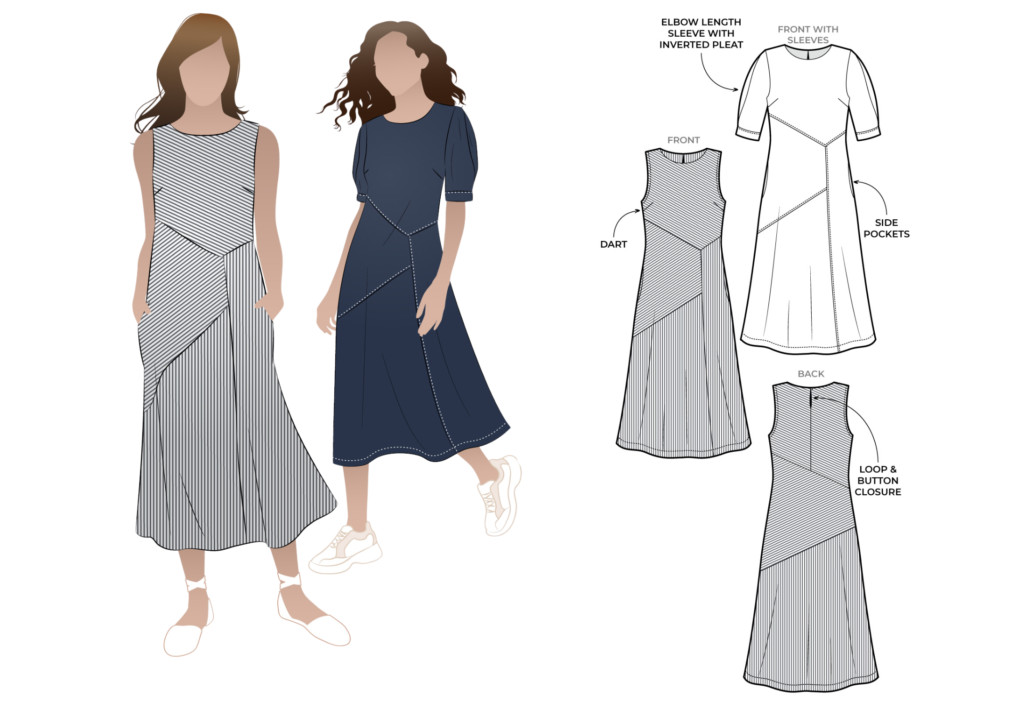
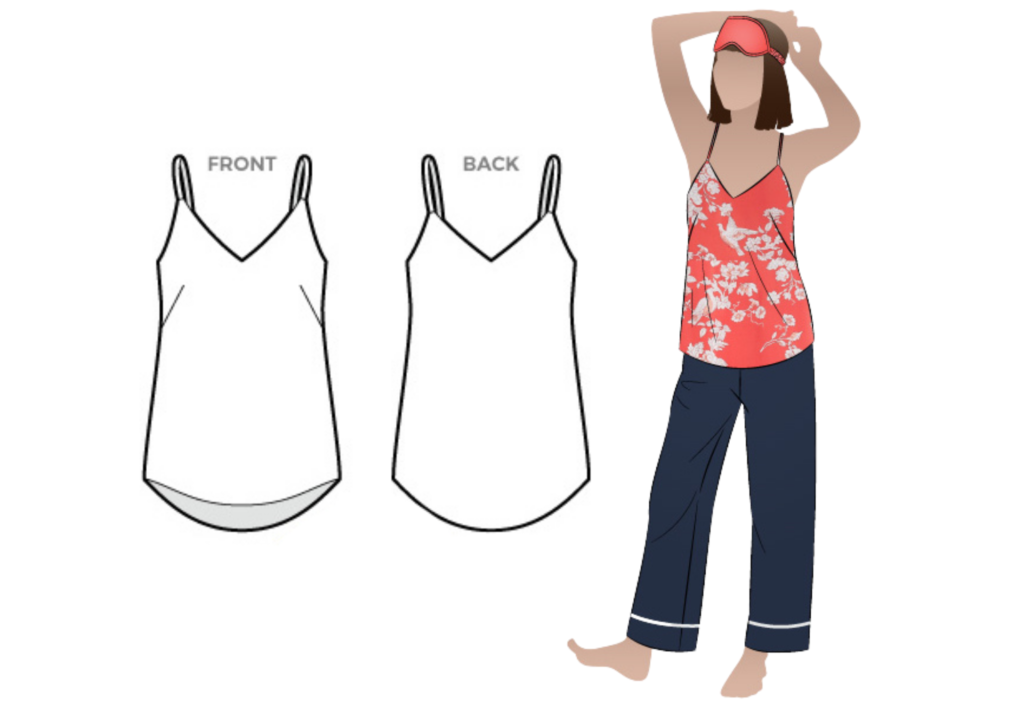
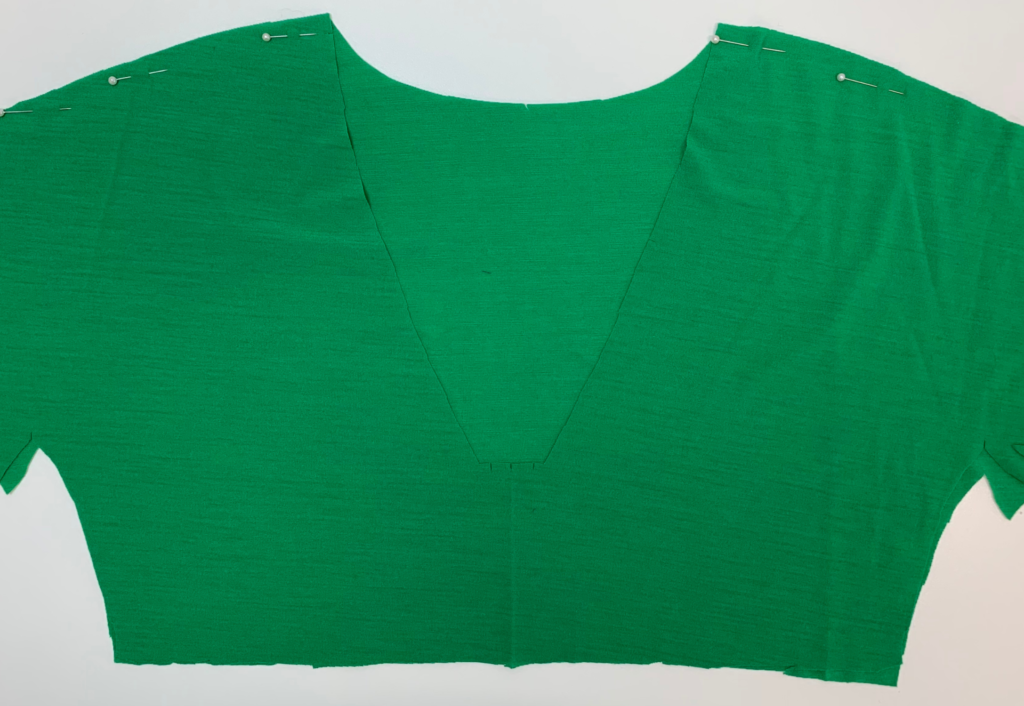
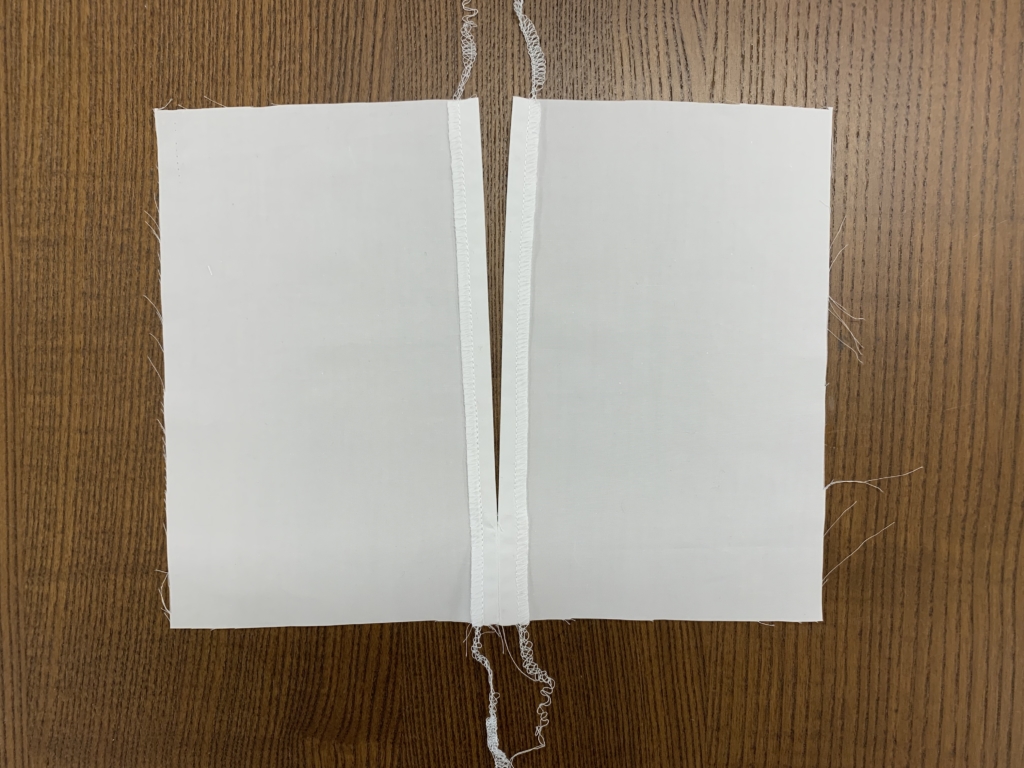
Stevie Jean Jacket

Posted on

CONSTRUCTION: FRONT BODY: With right sides facing sew the front jacket pieces (3, 4 & 5) together, matching the notches. Neaten with an overlocker/serger and press each seam outward. Sew a twin needle topstitch on the side of the side front and centre front panels. Neaten the outer 3 edges of the pocket facing with… Read More

Albie Woven Pant

Posted on

✏️  ✏️ CONSTRUCTION: BACK POCKETS: With wrong sides facing, press the top edge seam allowance (1cm/3/8”) of the patch pocket to the inside. Then with right sides facing, fold the top edge of the pocket over, following the fold line on the pattern. Sew down each side of the turnover, clip the corners and turn… Read More

Albie Woven Shirt

Posted on

Before you start sewing you might want to rummage through that fabric stash and plan your colour/print layout for the different panels of the Albie Woven Shirt, click the link below to download the Albie Woven Shirt Colour It Your Way PDF and have some fun! ✏️  ✏️ CONSTRUCTION: COLLAR: With right sides together the… Read More

Kingsley Bias Cut Dress and Cami

Posted on

CONSTRUCTION: Sew the rouleau straps. Fold the strap in half lengthways with right sides facing, sandwiching a length of cord inside to use to pull the strap through. Using a zipper foot, sew across the top of the strap, turn the corner and sew down the length to the end of the strap. Pull the… Read More

Hendrix Coat

Posted on

Before you start sewing you might want to rummage through that fabric stash and plan your colour/print layout for the different panels of the Hendrix Coat, click the link below to download the Hendrix Coat Colour It Your Way PDF and have some fun! ✏️  ✏️ HELPFUL HINTS: Hendrix is a complex panelled coat so… Read More

Livvy Woven Dress

Posted on

CONSTRUCTION: BACK BODICE: Click here to head to the Shirring tutorial if you need assistance shirring Neaten the top edge of the Centre Back Shirring Panel with an overlocker/serger. Set your machine up with shirring elastic on the spool and test the shirring on a scrap piece. When you have the tension correct sew the 14… Read More

Birdie Jumpsuit

Posted on

CONSTRUCTION: BODICE A – ROUND NECK Fuse/interface the front button turnback. Neaten the raw edges of the centre front bodices with an overlocker/serger. Stitch the armhole darts and press down. With right sides facing sew the front and back shoulder seams together, neaten using an overlocker/serger and press towards the back. With right sides facing… Read More

The Ellis Knit T

Posted on

CONSTRUCTION: ROUND/CREW NECK: With right sides facing sew the back and front shoulder seams together. Neaten with an overlocker/serger and press towards the back. Join the short ends of the neckband together, turn to the right side and press in half lengthways with wrong sides together. Stay stitch the two long raw edges together. Pin… Read More

Wren Jacket

Posted on

JACKET CONSTRUCTION: With right sides facing sew the top edges of the pocket and the pocket lining together, leaving a small opening (this will allow you to turn out the pocket to the right side). Refer to the notches on the pattern for the opening. With right sides together sew all the way around the… Read More

Queenie Woven Dress

Posted on

  🧵 Click here to watch a step by step sew along video featuring sleeve 2 and skirt with the hem frill! 🧵 CONSTRUCTION: BODICE: From the inside sew the bust darts and press downwards. From the inside sew the back bodice darts and press towards the side seams. With right sides facing sew the back… Read More

Women’s Knit PJs

Posted on

TOP CONSTRUCTION: With right sides facing sew the back and front shoulder seams together. Neaten with an overlocker/serger and press towards the back. Join the short ends of the neckband together, turn to the right side and press in half lengthways with wrong sides together. Stay stitch the two long raw edges together. Pin the… Read More

Carlsson Sweater

Posted on

CONSTRUCTION: With right sides facing, sew the front and back yoke pieces together at the shoulder seams. Neaten with an overlocker/serger and press towards the back. With right sides facing sew the short ends of the neck band together. Fold the neckband in half lengthways with the right sides facing out and stay stitch the… Read More

Columbus Knit Legging

Posted on

CONSTRUCTION: WAISTBAND: Take one piece of centre back waistband. This will be the inside waist layer. Snip the pocket opening notches at the inside LHS side seam, fold back and topstitch the pocket opening edge with zig zag or twin needle. Take the pocket bag and align with the seam opening, topstitch around the pocket… Read More

Columbus Knit Top

Posted on

CROP TOP CONSTRUCTION: With right sides together join the main centre front panel to outer side panel with stretch machine stitch or overlock/serger. Press the seams away from centre front. With right sides together sew the outer side panel to the outer centre back panel. Repeat for the inner layer. Cut elastic to your personal… Read More

Christina Woven Dress

Posted on

CONSTRUCTION: COLLAR & COLLAR STAND: With right sides facing, sew the outer and side edges of the collar together. Clip the corners, turn out to the right side and press. Sew a 6mm (¼”) topstitch around the outer edges of the collar. Sandwich the collar between the right sides of the 2 collar stands and… Read More

Columbus Woven Jacket

Posted on

CONSTRUCTION: BODY & SLEEVES: With right sides together sew the front bodice to the front sleeve at the armhole seam. Neaten with an overlocker/serger and press towards centre front. Sew a twin needle topstitch on the side of the body. Repeat for the back bodice/back sleeve armhole seams. With right sides together sew the shoulder… Read More

Trinnie Extension Pack

Posted on

CONSTRUCTION: SLEEVE 1: Short lantern sleeve for original Trinnie Woven Dress Bodice B only. Note the lower sleeve is double fabric. Sew the darts in the lower sleeves and press toward the centre. With right sides facing sew each of the underarm seams of the lower sleeves together and press open. With right sides facing… Read More

Sonny Knit Pant

Posted on

CONSTRUCTION: Take one piece of the Waistband, cut the pocket opening notches at the inside LHS side seam, fold back and stitch the pocket opening edge. Take the pocket bag and align with the side seam opening, topstitch around the curve. With right sides together join the side seams of the both waistbands, take care… Read More

Ernie Knit Pant

Posted on

CONSTRUCTION: POCKET: With right sides facing sew angled edge of the pocket to the angle pocket seam on the front leg, sew a flat stitch close to the seam on the side of the pocket, press this seam and sew a 6mm (¼”) topstitch to the pocket opening. Fold the pocket along the fold line… Read More

Simpson Sweatshirt

Posted on

CONSTRUCTION: POCKET: Fold the pocket top over with right sides facing, stitch down each side of the turnover, clip the corners and turn the pocket top out to the right side and press. Sew a topstitch across the edge of the pocket top turn back. Turn the outer pocket seams inward, press and put aside…. Read More

Genoa Bias Cut Skirt

Posted on

CONSTRUCTION: With right sides facing sew the front and back side seams together, matching notches as you sew. Press sides seams to the back and finish with an overlocker/serger. Neaten top of skirt with your overlocker/serger Sew short ends of elastic together and mark into quarters. Match elastic with centre front, centre back and side… Read More

Andrea Woven Vest

Posted on

CONSTRUCTION FRONT BODY & INSEAM POCKETS: With right sides together, sew the side front to the front panel, neaten seam with overlocker/serger and press towards the back. Sew the darts in the side front pieces and press towards the back. With right sides facing sew the centre back collar seams together and press open. Sew… Read More

Lizzie Wrap

Posted on

CONSTRUCTION BODY: With right sides facing sew the centre back seams together. Neaten with an overlocker/serger seam and press towards the wearers left. From the right side of the garment sew a 6mm (¼”) topstitch down the centre back on the side of the wearers left. POCKET WELT: *Disregard the seam above the welt in… Read More

Ayla Woven Skirt

Posted on

CONSTRUCTION: Sew the 3-hem darts that are marked on each of the lower skirts and press towards the centre. Sew an edge stitch close to the seam of the darts. With right sides facing sew the top skirt to the lower skirt, overlock/serge the seam and press upwards. Sew a 6mm (¼”) topstitch on top… Read More

Besharl Knit Tee

Posted on

CONSTRUCTION: With right sides facing sew the two short ends of the neckband together and press open. Turn to the right side and fold in half lengthways with wrong sides together. Stay stitch the two raw edges to hold in place. Lightly press and put aside. With right sides together sew each long edge of… Read More

Ethel Designer Top – Armhole Facings

Posted on

This tutorial explains how to sew the armhole facings of the Ethel Designer Top ARMHOLE FACING: Neaten the outer curved edge and short edges of the armhole facings with an overlocker/serger. With right sides together pin the armhole facings to the armholes following the notches. Once in place stitch from the step notch at one… Read More

Tatum Woven Dress

Posted on

CONSTRUCTION BODY: With right sides together sew the front and back shoulder seams. Overlock/serge the edges and press towards the back. With right sides together sew the centre back CB Bodice, Side Back and Side Front Bodice seams. Overlock/serge the edges and press towards the CB. Repeat for CB Skirt and Side Back Skirt panels…. Read More

Miranda Skirt

Posted on

CONSTRUCTION: With right sides facing, sew the two lining pieces together at the side seams, neaten the seams with an overlocker/serger and press towards the back. Neaten the bottom edge of the lining with an overlocker/serger.   Using a large gathering stitch, join the six tulle skirt pieces together, sewing two rows along the top… Read More

Ines Knit Dress

Posted on

CONSTRUCTION: POCKET FLAPS: With right sides together sew the fused/interfaced flaps together along the base and the sides, clip the corners and turn out to the right side. Topstitch around the 2 short and long folded edge then sew a stay stitch across the cut edges (top) of the flap to hold in place and… Read More

Meredith Woven Dress

Posted on

CONSTRUCTION: Stay stitch or fuse the front and back necklines to prevent them from stretching. Neaten each centre back bodice seam with an overlocker/serger. Sew the invisible zip into the centre back seam (see Invisible Zip tutorial on stylearc.com). With right sides facing sew the lower centre back seams together finishing at the base of… Read More

Loddon Woven Pant

Posted on

CONSTRUCTION: POCKETS: With right sides facing sew the pocket bag to the fused angled pocket seam on the front leg. Turn the pocket to the inside and understitch close to the seam on the side of the pocket bag. Topstitch along the pocket opening. With right sides facing sew the pocket bearer to the pocket… Read More

Venn Knit Tunic Top

Posted on

CONSTRUCTION: With right sides facing sew the centre back seams together. Neaten with an overlocker/serger and press towards the wearers right. With right sides together sew the front shoulder seam to the back shoulder seam. Neaten with an overlocker/serger and press towards the back. With right sides facing sew the short ends of the neckband… Read More

Palmer Woven Dress

Posted on

CONSTRUCTION: COLLAR & COLLAR STAND: With right sides facing, sew the outer and side edges of the collar together. Clip the corners, turn out to the right side and press. Edge stitch around the outer edges of the collar. Place the collar between the right sides of the collar stands and stitch together, sandwiching the… Read More

Yoyo Knit Skirt

Posted on

With right sides facing sew the front and back side seams together, matching notches as you sew. Neaten with an overlocker/serger and to the back. Sew the short ends of the elastic together. Mark the elastic with chalk at the centre front, centre back and side seams and pin the elastic to the waist of… Read More

Yoyo Knit Top

Posted on

Start by sewing the ‘V’ into the front neckline. With right sides facing sew the ‘V’ insert and the body together, start sewing from the neck to the base of the ‘V’. Carefully clip into the ‘V’ on the body then repeat for the opposite side. Neaten with an overlocker/serger and press towards the body…. Read More

Blanche Knit Dress

Posted on

CONSTRUCTION: With right sides facing sew the centre back seams together. Neaten with an overlocker/serger and press towards the wearers right. With right sides facing sew the front and back shoulder seams together. Neaten with an overlocker/serger and press towards the back. With right sides facing, sew the two short ends of the neckband together…. Read More

Byron Woven Top

Posted on

CONSTRUCTION: With right sides together sew the shoulder seams of the back and front bodice and press open. From the inside sew the bust darts as marked on the pattern and press downward. With right sides together sew the shoulder seams of the back and front facings and press open. With right sides together sew… Read More

Tommie Jeans Skirt

Posted on

CONSTRUCTION FRONT POCKETS: Double turn the top edge of the coin pocket to the inside and sew down with a twin needle topstitch. Turn the side edges of the pocket to the inside. Press and pin the coin pocket to the right pocket facing, once in place sew on with a twin needle. Neaten the… Read More

Celeste Woven Shirt

Posted on

CONSTRUCTION: COLLAR & STAND: With right sides facing, sew the outer and side edges of the collar together. Clip the corners, turn out to the right side and press. Press the seam allowance of the lower edge of the outer collar stand to the inside. Place the collar between the right sides of the collar… Read More

Claude Woven Pant

Posted on

CONSTRUCTION: Neaten each front crotch seam with an overlocker/serger. From the inside sew the four front and back darts. Press toward the side seams and edge stitch close to the seam of each dart. With right sides together sew the side seams of the front and back waist facings together and press open. With right… Read More

Hope Dress Extension Pack

Posted on

SLEEVE 1: With right sides facing sew the sleeve seams together. Neaten with an overlocker/serger and press toward the back. Referring to the elastic size chart, cut the two lengths of the elastic for the sleeves. Lay one edge on top of the other and securely stitch together. Neaten the sleeve opening with an overlocker/serger… Read More

Beatrice Pea Coat

Posted on

CONSTRUCTION: POCKETS: With right sides facing sew the outer vertical edge and short ends of the pockets flaps together. Clip the corners and turn to the right side and press. Sew a 6mm/1/4” topstitch around the 3 outer edges of the pocket flaps. With right sides together, lay the pocket flap onto the front piece… Read More

Monroe Woven Top

Posted on

CONSRTUCTION: Sew the back neck guide to the wrong side of the inner back neck seam and the back armhole guides to the wrong side of the inner back armholes. With right sides facing sew the back neck seams together, press seam towards the inner back. From the right side, understitch close to the seam… Read More

Spencer Woven Pant

Posted on

CONSTRUCTION: FRONT POCKET/PLEAT: Fold the front waist pleat and stitch down to the mark on the pattern, press the pleat toward the centre front and stay stitch along the waist to hold in place. With wrong sides facing press the pocket binding in half lengthways, press and stay stitch the long edges together to hold… Read More

Camile Knit Dress

Posted on

CONSTRUCTION: BODY, COLLAR & SLEEVES: With right sides facing sew the front body to the side insert panel, neaten with an overlocker/serger and press towards the front body. With right sides facing sew the back body to the side insert panel, neaten with an overlocker/serger and press towards the back body. With right sides facing sew the… Read More

Shirring

Posted on

Click here to view an Instagram reel with our top tips for shirring Click here to watch a Youtube shirring tutorial  

Lila Tiered Skirt

Posted on

CONSTRUCTION: With right sides facing sew the two pieces of tier #1 together at the side seams, neaten the seams with an overlocker/serger and press. With right sides facing sew the two pieces of tier #2 together at the side seams, neaten the seams with an overlocker/serger and press. With right sides facing sew the… Read More

Xanthe Woven Dress

Posted on

CONSTRUCTION FRONT/TUCKS: Click here to watch an Instagram reel of how to sew the tucks. With right sides facing pin the 5 tucks to the inside of the front bodices, pin from the shoulder line down to the markings on the pattern followed by tacking the tucks. Once in place sew the tucks, remove the… Read More

WILMA.TEENS.DRESS

Posted on

STEP-BY-STEP TUTORIAL on sewing the Wilma Teens Dress #SAWilmaTeensDress BODICE & STRAPS: With right sides facing sew the front and back bodice lining pieces together, down the side seam. Neaten seam with overlocker/serger and press to the back. Repeat for the main bodice pieces. 2. Sew two rows of a large gathering stitch to the top… Read More

Lucia Knit Top

Posted on

CONSTRUCTION: Neaten each side of the front cowl collar extension between the notches by sewing a double turned narrow hem. See the markings on the pattern. With right sides facing sew the centre front seams together, stitch from the centre front notch down to the hemline. Neaten with an overlocker/serger and press toward the wearers… Read More

Esther Woven Dress

Posted on

CONSTRUCTION: Sew the bust darts and press downwards. Neaten each centre front and centre back seam with an overlocker/serger. With right sides facing sew the centre front seams together starting at the * noted on the pattern, 6mm (¼”) down from the ‘V’ neck and press the seams open. With right sides facing sew the… Read More

Logan Shacket

Posted on

CONSTRUCTION BREAST POCKETS Neaten the top edge of the pocket with an overlocker/serger (you can also fold this edge at the first notch with wrong sides together and press like I have done here). With right sides facing, fold the pocket top over at the fold line and sew down each side of the turnover,… Read More

Glenda Knit Top

Posted on

CONSTRUCTION Sew a large gathering stitch around the left front armhole from the shoulder seam down to the notch, draw in the stitch to match the length of the gathering guide. Pin the guide to the gathered armhole and stitch together to keep the correct armhole shape and length. With right sides facing sew the… Read More

Andie Kids Dress

Posted on

Neaten the outer straight edge of the frills by overlocking/serging then turning in once and stitching, alternatively you can double turn and sew a narrow hem. Sew a large gathering stitch between the notches on the opposite edge, draw in the gathering stitch to the measurement between the notches on the front and back armhole…. Read More

Philomena Woven Dress

Posted on

CONSTRUCTION BODICE: Fuse or stitch the stabilizer to the neck of the front lining and the neck of one back yoke. Sew the bust darts on the front under bodice (lining) and press down followed by sewing the centre front seams together stopping at the * marking on the pattern and press open, no need… Read More

Delta Cargo Pant

Posted on

CONSTRUCTION: FRONT ANGLED POCKET & SIDE SEAM: With right sides facing sew the pocket bag to the angled pocket seam on the front leg, turn the pocket to the inside and understitch close to the seam on the side of the pocket bag. Sew a twin needle topstitch along the pocket opening. With right sides… Read More

Mitred Corner

Posted on

Mark your hem and vertical seam points, we have just done this by pressing the foldlines. Overlock/serge your hem edge, vertical seam edge and the diagonal edge that will become your mitred corner. With right sides facing, fold the angled edge, matching the hem and vertical seam. Sew the angled edges together using a 1cm (3/8″)… Read More

Ada Knit Top

Posted on

CONSTRUCTION: With right sides together sew the front body & back body shoulder seams together. We recommend sewing cotton tape or fusing the shoulder seams to stop any stretching. If sewing on a sewing machine, overlock/serge the seams and press to the back. With right sides facing sew the short ends of the neckband together…. Read More

Penelope Woven Dress

Posted on

CONSTRUCTION POCKETS/SIDE PANELS: With right sides facing sew one set of the pockets marked “A” to the front side seam marked “A” on the pattern, clip at the notches. Turn to the correct side of the fabric and sew an understitch close to the seam on the side of the pocket bag. With right sides… Read More

Asha Dress

Posted on

CONSTRUCTION: BODICE: Gather the front neck between the notches to 9cm (3 1/2”), refer to the neck guide. With right sides facing sew the front and back shoulder seams together. Neaten with an overlocker/serger and press towards the back. Overlock/serge each centre back seam. With right sides facing sew the centre back bodice seams together…. Read More

Darby Woven Pant

Posted on

POCKETS: Clip at the notches on the side edge of the pockets and double turn the stepped turn back to the inside of the pocket. Topstitch across the top and down the edge of the turnback then across the base of the turnback. Press the remaining 3 outer to the inside at the seam allowance… Read More

Teddy Designer Top

Posted on

COLLAR: With right sides facing pin the outer edges of the collar together. Turn out to the right side, press and sew a stay stitch along the two outer edges of the collar to hold in place, be careful not to stretch this edge. Carefully press and put aside. Note when wearing this garment, the… Read More

Candice Skirt

Posted on

CONSTRUCTION: Fold & pin the pleats as marked on the pattern, once in place stitch down to the markings, from the inside. Centre the pleat over the seam and press flat. On the inside of the skirt the pleats will be box pleats, on the outside the pleats will be inverted pleats, five on the… Read More

Effie Woven Top

Posted on

CONSTRUCTION: With right sides facing sew the length of the loop, turn it out to the right side, make a loop shape and stitch it into the left back neck as noted in the pattern. Neaten the centre back seams with overlocker/serger and sew the seams together, from the hemline up to the notch that… Read More

Montana Extension Pack

Posted on

BODICES BODICE A: Sew the bust darts and press down. With right sides together sew the front and back shoulder seams together overlock/serge and press toward the back. With right sides together sew the front and back shoulder seams of the fused facing pieces together and press the seams open. With right sides together pin… Read More

Yvette Woven Dress

Posted on

Before you start sewing you might want to rummage through that fabric stash and plan your colour/print layout for the different panels of the Yvette Woven Dress, click the link below to download the Yvette Woven Dress Colour It Your Way PDF and have some fun! ✏️  ✏️ FRONT & POCKETS From the wrong side sew the… Read More

Bennet Woven Pant

Posted on

Fold the top edge 1cm wrong sides facing then with right sides facing fold the top edge of the pocket over, following the fold line on the pattern. Sew down each side of the turnover, clip the corners and turn the pocket out to the right side and press. Edge stitch along the inner folded… Read More

Lena Shift Dress

Posted on

Lena Shift Dress Tutorial by Lou Sheffer from Sew Much to Design  @sewmuchtodesign Introducing the Lena Dress a wonderful sheath A-line dress that will bring a chic versatile look to your wardrobe.   Lena is a mid-length sleeveless dress that features a boat neck with large inseam pockets and hem facing that both feature twin… Read More

Carlisle Jean

Posted on

FRONT POCKETS: Double turn the top edge of the coin pocket to the inside and sew down with a twin needle top stitch. Turn the side edges of the pocket to the inside, press and pin the coin pocket to the right pocket facing, once in place sew on with a twin needle. Overlock/serge the… Read More

Smith Woven Jacket

Posted on

POCKETS & FRONT BODY Neaten the top edge of the pockets with an overlocker/serger. Fold the pocket top over with right sides facing, sew down each side of the turnover, clip the corners and turn the pocket top out to the right side. Fold the three remaining pocket seams inwards and press. Pin the pockets… Read More

E T T A . S K I R T

Posted on

E T T A . K I D S & T E E N S . S K I R T STEP-BY-STEP TUTORIAL     PATCH POCKETS & BACK SKIRT: 1. Neaten the top edge of the pockets. 2. Fold the top edge of the pocket over with wrong sides facing, following the fold line on the… Read More

Geri Dress

Posted on

Fuse the stabilizer to the wrong side of the back neck. With right sides together sew the centre back seam, overlock/serge, press the seam towards the wearers left. With right sides together sew the back panels to the side back panels, overlock / serge and press the seams toward the centre back. With right sides… Read More

Autumn Dress

Posted on

Autumn Dress Tutorial by Lou Sheffer from Sew Much to Design Follow her on Instagram @sewmuchtodesign I am in love with the styling of the Autumn Dress by Style Arc.   It will be a perfect transition dress as our summer days grow cooler and I am looking for something that is more structured and offers… Read More

Percy Poncho

Posted on

BODY: With right sides together sew the centre back seams and press open. With right sides together sew the back neck facing to the back neck, clip into the rounded neck seam, turn to the right side and understitch close to the seam on the side of the facing. Overlock or serge the vertical centre front… Read More

T E D D Y . J A C K E T . C H E R Y L ‘ S . V E R S I O N

Posted on

STEP-BY-STEP TUTORIAL on sewing the Teddy Kids/Teens Jacket #SATeddyKidsJacket & #SATeddyTeensJacket Please note this tutorial differs slightly from the “Style Arc” constructions sheet 1. With right sides facing sew one set of the pockets to the front side seam, see notches on the pattern, clip at the notches and sew an understitch close to the seam on the side… Read More

Ormond Designer Coat

Posted on

COLLAR: With right sides facing sew the under-collar centre back seams together and press open. With right sides facing sew the longer edge of one collar stand to the bottom of the undercollar and repeat for the remaining collar stand and collar piece, press the seams open and sew and edge stitch either side of… Read More

Keith Knit Vest

Posted on

BODY: With right sides facing sew the front and back shoulders together, take care not to stretch whilst sewing. Neaten with overlocker/serger and lightly press/steam toward the back. Overlock or serge the armhole, turn the armhole hem allowance inside and pin in place, take care not to twist, once in place sew the turnback down… Read More

Kennie Woven Shirt Sewing Tutorial by @becsewsthings

Posted on

STEP-BY-STEP TUTORIAL #SAKennieWovenShirt Tutorial varies slightly from Style Arc construction sheet by @becsewsthings As part of the Queen’s Platinum Jubilee celebrations, the Duke and Duchess of Cambridge shared some photographs of the Duchess baking with her children. In these pictures the Duchess is pictured wearing a pink and white gingham shirt with a ruffled collar,… Read More

M A R G O T . T E E N S . S K O R T

Posted on

M A R G O T . T E E N S . S K O R T STEP-BY-STEP TUTORIAL       TIES & OVERLAY: With right sides facing sew the length and one end of the ties, turn out and press. Put aside until arriving at step 6 on the construction sheet for… Read More

Elsbeth Woven Dress

Posted on

BODICE: Sew two large rows of gathering stitches to the bottom of the front bodice piece, where noted on the pattern. Gather in the bottom of the bodice to match the length of the waist on the centre front skirt panel. With wrong sides facing fold and press the waist bias trim in half, lengthways…. Read More

Olivia Dress

Posted on

BODICE: With right sides facing sew the front shoulders to the back shoulders. Neaten seam with an overlocker/serger and press to the back. Neaten around the armhole with an overlocker/serger, fold and press towards the inside. Topstitch around the armhole. Sew a bar tack at the underarm seam to secure the base of the armhole… Read More

M A R G O T . K I D S . S K O R T

Posted on

STEP-BY-STEP TUTORIAL #SAMargotKidsSkort Tutorial varies slightly from Style Arc construction sheet In this example I made the skort with top and under frill. You can also make the skort with only one frill. If you would like to make a shorts, just leave out the overlay and then you can also choose to make the… Read More

Hope Woven Dress

Posted on

BODICE: With right sides facing sew the front armhole to the front sleeve matching the notches as you sew followed by sewing the back armhole to the back sleeve. Neaten with an overlocker/serger. Neaten each centre back edge with an overlocker/serger. Sew the centre back seams together, stitch from the waist up to the notch… Read More

Eileen Dress (Knit Version)

Posted on

BODICE & SLEEVES: With right sides facing sew the centre front seam together. Neaten seam with overlocker/serger and press to the wearer’s right. Turn to the right side of the fabric and topstitch 6mm (¼”) on the wearer’s right front piece, through the seam allowance underneath. With right sides facing sew the centre back seam… Read More

R H Y S . K I D S . O V E R S H I R T

Posted on

STEP-BY-STEP TUTORIAL – By Nicole @nic_combi_naait Please note this tutorial differs slightly from the “Style Arc” constructions sheet #SARhysKidsOvershirt For this over shirt I used a double gauze fabric. This kind of fabric is iron free (and I love that) and light enough to be used as an over shirt, but also suitable to be… Read More

Verona Woven Top

Posted on

Harmony Woven Top Tutorial by Lou Sheffer from Sew Much to Design Follow her on Instagram @sewmuchtodesign Introducing the Verona Top by Style Arc.  This is a stylish top, a contemporary take on a classic bohemian style.  It is a pull on top with a button and loop closure and fashion forward gathered sleeves.   It… Read More

Millicent Wrap Dress

Posted on

NECKBAND & BODICE: Fuse the back neck band, front neck band (and fold in half lengthwise wrong sides together), back waist insert and front waist insert & ties up until marked fuse line on the pattern. With right sides facing sew the top edges of the back neck seam together, turn to the right side… Read More

Loungewear Cami

Posted on

Please note this tutorial differs slightly from the Style Arc construction sheet. 1. With right sides facing fold and press the shoulder straps in half, length-ways. Sew two rows of stitching if desired, for extra strength. 2. Turn through to the correct side using a loop turner. Press and edge stitch around all edges of… Read More

Winona Knit Top Neckband

Posted on

With right sides facing, sew the front and back shoulder seams together. Neaten seam with overlocker/serger and press seam to the back. With the right sides facing outward press the front band in half lengthways, matching notches. Wrap the front of the band as marked on the pattern and then sew a stay stitch to hold… Read More

June Sheath Dress

Posted on

Sew the bust darts as marked on the front body and press down. With right sides facing sew one set of the pockets to the front side seam where marked on the pattern, clip at the notches. From the right side understitch close to the seam on the side of the pocket bag. Press pocket… Read More

Bob Woven Pant

Posted on

LEGS/POCKETS: With right sides together sew one set of pockets to the front side seam and one set of pockets to the back side seam (see pocket notches on the side seams) once the pockets are stitched on turn to the right side and understitch along the pocket seam on the side of the pocket. With… Read More

Zip – Fly Zip Tutorial

Posted on

Click here to watch our fly zip tutorial on Youtube Or follow the diagrams below: Step 1 Fuse noted pieces. Sew fly facing to right side crotch. Step 2 Turn to face & press. Set aside. Step 3 Sew zipper to left side crotch. Step 4 Cover zipper with bearer & sew. Turn to face… Read More

Francesca Woven Shirt

Posted on

BODY & FRILL: Sew the front darts and the back darts. With right sides facing sew the front and back shoulders seams together. Press seam to the back and neaten with overlocker/serger. With right sides facing sew the front and back side seams together (not pictured). Press to the back and neaten with overlocker/serger. Sew… Read More

Joy Woven Vest

Posted on

BODY AND POCKET WELTS: With right sides facing sew the centre front body to the side body, matching notches as you sew. With right sides facing sew the centre back seams together, until the split notch. With right sides facing sew the side back body to the back body, following notches as you sew. Press… Read More

Harmony Woven Top

Posted on

Harmony Woven Top Tutorial by Lou Sheffer from Sew Much to Design Follow her on Instagram @sewmuchtodesign The Harmony woven top by Style Arc is the perfect way to welcome Spring. It offers chic styling in and easy to wear design. Boasting gorgeous flounced sleeves, this top offers effortless feminine vibes for your wardrobe. I… Read More

Anais Woven Dress

Posted on

POCKETS: With right sides facing sew one set of the pockets marked “A” to the front side seam marked “A” on the pattern, clip at the notches and sew a flat stitch close to the seam on the side of the pocket bag. With right sides facing sew the second set of pockets to the… Read More

Nicola Woven Shirt

Posted on

BODY: Sandwich the back bodice between the two back yokes, sew and press. Press both yoke pieces upward. Sew a 6mm (¼”) top stitch across the back yoke seam, if desired (not pictured). Roll the whole back body up with the right side on the inside then pin to keep it out of the way. Pin… Read More

Zip – Lapped Zip Tutorial

Posted on

Sew the seam up to the bottom of zip, usually indicated by a notch. Press seams open and neaten with overlocker/serger. Align the right side of your zipper with the right folded edge of the fabric. There should be a small gap between the zipper teeth and the fabric edge. Pin the zipper down. With the… Read More

H A R L O W . K I D S . T O P . D U T C H

Posted on

Stap voor stap werkbeschrijving voor de   #SAHarlowKidsKnitTop Het patroon is gemaakt voor rekbare stoffen zoals tricot. Je kunt de top ook in french terry maken, maar gebruik voor de halsboord dan wel boordstof. Voor een nettere afwerking adviseer ik om een lockmachine te gebruiken. Voorbereidingen – Knip alle patroondelen uit je stof – Kijk… Read More

Norman Jumpsuit

Posted on

Sew your pockets as per instructions or your preferred method. Neaten each centre front seam with an overlocker/serger. With right sides facing sew the upper front crotch seams together, sew from the notch near the base of the front crotch and finish 6mm (¼”) before arriving at the “V” neck. The lower crotch seam is… Read More

H A R L O W . K I D S . K N I T . T O P

Posted on

Step-By-Step Tutorial #SAHarlowKidsKnitTop Tips for working with stretchy fabrics: – use an overlocker / serger – use a stretch stitch – if you want to use a straight stitch, use a stretch thread (Seraflex for example)Preparations – Cut out all the pattern pieces. – Take notice of the grainline as mentioned on the pattern pieces… Read More

K I T . K I D S . T A N K . T O P

Posted on

Step-By-Step Tutorial #SAKitKidsTankTop Preparations – Cut out all the pattern pieces. – Take notice of the grainline as mentioned on the pattern pieces and also the pattern pieces that need to be cut on the fold. – Mark and clip all the notches on your pattern pieces – When finished, you should have 12 cut… Read More

Bodice (Double Layered) Tutorial

Posted on

We have used this double layered method for our Nova Midi Dress, Montana Midi Dress and for the facing of the June Sheath Dress. For this tutorial I have used the Nova Midi Dress pattern. The construction sheet instructs that you should cut 2 main front bodice and 2 main back bodice. I am treating… Read More

Applique Tutorial

Posted on
how to applique-tutorial-by-style-arc

Step 1 Select your applique fabric/s and play around with layering them to see if the colours and or prints work well together and are to your liking. Next you will need to pre-wash your fabrics and iron them before you start working with them. This will eliminate shrinkage and colour fastness issues down the… Read More

Felled Seam Tutorial

Posted on

This sewing tutorial demonstrates how to sew a felled seam and will come in handy for our Meghan Jacket. Step 1. With right sides facing sew the seams together Step 2. Trim away the left seam to 6mm/1/4" Step 3. Press the right seam to the inside by 6mm/1/4", place this seam over the left… Read More

Mitred Shoulder / Collar Seam Sewing Tutorial

Posted on
Style Arc Sewing Tutorial - How to sew a mitred shoulder / neck

Suitable for the Mason knit Jacket, Estelle Ponte Jacket and the Harper Jacket. Step 1. Sew the centre back body seams followed by sewing the centre back collar seams together, we suggest a Felled or French seam as the collar seam is visible from both sides when worn. Step 2. Clip into the seams at… Read More

Flat Stitch or Understitch Tutorial

Posted on

The flat stitching (or understitching) is sewn to keep facings and linings from peaking out, especially around necklines and armholes and around the waist on a lined skirt to stop the lining riding up. It also means that when turned and pressed, the seam line tends to favor the inside of the garment.

Corner Seams Tutorial

Posted on
Sewing Tutorial - how to sew corner seams

This is a quick tutorial on how to sew corner seams, it will come in handy for the following patterns: Serena Knit Dress Paige Top-dress Renae Woven Dress Mila Designer Dress Step 1. The acuteness of the angle will vary, depending on the design. The execution of the corner is the same, regardless of the… Read More

Paris Tote Bag Sew-Along With Ann

Posted on

Style Arc Paris Tote Bag

I don’t normally sew handbags. (In general I’m not a craft or home decor sewer.) But lately I’ve been wanting something classier than my old nylon L.L.Bean bag. In addition to being turned off by the high prices retailers demand for genuine leather bags, I realized that I wanted something more unique than what was being offered. That’s when I decided to make the Paris tote… Continue Reading On clothingengineer.com

Dotty Blouse construction by Anne Kowalski

Posted on

This clever pattern creates beautiful draping at the front while leaving the back as a regular shirt. Wear it with a cami or use a press stud to close the cross over at the front. You will love this top! Fabric Suggestions: Silk, crepe, viscose or you could use a jersey knit. Because of the… Read More

Poppy Zip Top construction by Anne Kowalski

Posted on

Fabric Suggestions: Light weight suiting, linen Helpful Hints: The back hem facing/ side hem facing seam is located about 2.7cm (1″) beyond the side back pleat seam. This is to minimize bulk at the pleat fold. Make sure to mark the notches at the hemline carefully on both the body panels and facing. Construction: Sew… Read More

Romy Anorak construction by Anne Kowalski

Posted on

Fabric Suggestions: Charmeuse, soft wool or any soft fabric of your choice. Trims: My suggestion: include “shock cord” and “elastic cord” as an alternative to”hat elastic”. It is easier for US-based customers to source. Helpful Hints: Cut out the pattern, taking note of the grainlines, maximum stretch, and the notes written on the pattern pieces… Read More

Jett Jacket construction by Anne Kowalski

Posted on

Construction With right sides together fold back and press the front panel where marked on the pattern toward the inside of the garment (wrong sides together.) Now turn back the folded edges so right sides are together, but do not press. Starting from the folded edge, stitch across the top edge of the neck edge… Read More

Neckline Finishing Tutorial

Posted on

This is quick & easy way to finish neckline of your garment. This method can be used on stretch & woven fabrics.With right sides together sew the short ends of the neck bandTurn to correct side & press the band in halfPin neckband to neck; once in place sew on matching notches.Fold neckband at centre… Read More

Collar and Collar Stand Tutorial

Posted on

This collar sewing tutorial will help you when sewing blouses, shirts and shirt dresses. This is basic Style Arc sewing tutorial covers how to sew a collar to a collar stand and a collar stand to a neckline. Follow the steps below to make the perfect collar! Step 1 Lay collar pieces face-to-face and stitch around the outer edge… Read More

Fly Zip Tutorial

Posted on

Step 1 Fuse noted pieces. Sew fly facing to right side crotch. Step 2 Turn to face & press. Set aside. Step 3 Sew zipper to left side crotch. Step 4 Cover zipper with bearer & sew. Turn to face & top-stitch close to seam. Step 5 Join left & right crotch seams up to… Read More

Sleeve – Two Piece Sleeve Tutorial

Posted on

Step 1 Pin top sleeve & under sleeve pieces together. Stretch undersleeve slightly to cover the top sleeve ease. Distribute the ease evenly. Step 2 Stitch seam from under sleeve, making sure there no tucks or pleats in the seam. Step 3 Pin & stitch the second seam. Step 4 Press all seams open.

Set a Sleeve Tutorial

Posted on

Step 1 Make x3 rows of loose stitching on the sleeve cap only. Make sure the stitchings are located inside the seam allowance. Step 2 From the inside of the garment pin sleeve to armhole matching notches. Then start pulling the threads to gather the sleeve cap so it matches the armhole. Distribute ease evenly…. Read More

Binding Tutorial

Posted on

This is a quick & neat technique & you can use it to sew any type of binding – neck, armhole, hem, splits, etc… Step 1 Fold binding in half lengthwise & press. Step 2 Then fold seam allowance of one of the edges & press. Step 3 Pin & sew unfolded edge of binding… Read More

Pockets – Inseam

Posted on

Click here to watch an Instagram reel of how to sew inseam pockets. Step 1 Sew pocket bag 1 to the main front where marked on the pattern (A-A) Step 2 Clip at notches Step 3 Turn to inside and press. Top-stitch pocket opening or flat-stitch close to the seam from the inside. Step 4… Read More

Sleeve Girth Adjustment Tutorial

Posted on

Step 1 Slash and square lines (A) and (B). Step 2 Open centre by pivoting pieces from points (A) and (B) – like shown on the diagram. Step 3 Square off hemline. And smoothen the shape of sleeve head. Step 4 The outer pattern measurements remain as original. And the cross head and the girth… Read More

Flat Seat Pattern Adjustments

Posted on

Step 1 Use basic back leg pattern piece. This original pattern should measure up to your waist and hip measurement. Redraw this piece to work on as it is important to retain the original pattern piece to keep as a reference. The straight grain line is obtained by folding the pattern piece in ½ starting… Read More

Centre Back Vent Tutorial

Posted on

Step 1 To create a neat corner Fold corner on 45 degrees, match notches & pin Step 2 Then using tailor’s chalk draw a line front the notches to the folded edge. Make sure the line is on 90 degrees from the folded edge. Then stitch along the line. Step 3 Trim access fabric; turn… Read More

Zip – Invisible Zip Tutorial

Posted on

Step 1. Turn zipper to wrong side & align with pattern edges. Step 2. Using tailor’s chalk make several marks on fabric & zip. These marks will help you to align zipper & fabric evenly when sewing zipper in. Step 3. Open zipper fully & place one edge of the zipper over edge of pattern… Read More

Emily Knit Top

Posted on

The Emily Knit Top is our free pattern of the month for July 2014. You get it free with every order – but only in July 2014. You just need to let us know what size you’d like in the comments box when you order. It would be a very a simple make if it… Read More